

 I have been making teapots lately. I made a new press mold for the spouts and I like this one a lot better than the previous one. The shape and scale of the spout are much more fitting to the teapots I want to make. The mold itself is also much better, I guess the more you do something the better you get at it.
I also changed the handle a little. I made it wider than past handles as I find that a wider chunkier handle is more comfortable and also more sturdy feeling. I made the handle attachment on the front overlap the seem of the top of the spout. I have had problems with the spout cracking in this area so I figure this will solve that problem. I also like the look of the handle kind of wrapping around the spout. I also made the negative space created by the handle more of an elliptical shape as opposed to round. This reflects the shape of the pot better and also leaves less room for error as with a round handle it is very easy to detect any bumps in the form.
The body of the pot is new as well as the lid and the feet. I have not made teapots for a while so, naturally, I have found lots of new ideas I want to try. I am continuing on a process that I have described several times of working in a sort of evolving series that will eventually 'hopefully' end with my ideal teapot form.
I have been looking at a lot of medieval English/ancient Japanese inspired pottery, such as the pots of Hamada, and Bernard leach. And more recently, Phil Rodgers and Jim Malone. I am finding it hard to incorporate these ideas into my work while still keeping the pots 'simple' enough for an Anagama firing. I find that the best pots, for me, out of any wood firing but especially an Anagama are strong and confident but simple. This minimalist style sort of leaves a blank canvas for the kiln to paint on. With teapots especially, I find it very challenging to have all of the elements of the pot working in harmony in an uncluttered way.
There are countless small details that aid this minimalist style. Several that I have chosen to incorporate into my design are as follows. A press molded spout- Simple, smooth, and flowing design helps to not distract from the pot as a hole. A lid that completes the spherical shape of the pot- Simple, completes the profile, continues the texture to the last 1/16in of the pot.
The pictures are arranged in the order in which they were made. The first teapot is at the bottom and the latest teapot is at the top of the page. On the latest teapot I switched to a handle on the back of the teapot as opposed to the over the top handle. I found that this handle helps to balance out the spout. The line is continued from the tip of the spout down to the bottom of the spout through the teapot to the bottom of the handle and ending in the top of the handle.
I am reasonably happy with the latest teapot, but I have some new ideas which will drastically change the design. I think they are moving in a good direction and I am excited to see how my new ideas translate in to a three dimensional object.
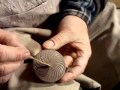
 I recently made a series of larger lidded jars. This is a form that I have made a lot of in the past but I haven't for a while. I like making big round pots because they are very satisfying when everything works out. On the other hand, I don't like making these big pots because it is very frustrating when things don't work out. I tried and continued several ideas with this series. I continued with a style of knob which I have been working with. I like this idea because it gives a nice finish to the top of the piece and it gives your eye an upward motion. For whatever reason, to me, upward motion is a positive feeling in a pot. On some of the jars the proportions were a little off, or as with the center jar in the picture below, the form makes the lid appear to sit higher, which I do not like. I think the the jar pictured above, as well as on the left of the picture below, has appropriate proportions as well as a nice form. My criticism of these jars in general is that the form is to round, aka- it does not match the undulating rhythm of the rest of the pot(lid, foot, texture, and trimming marks). The walls of the pot are a little more lively on the rope textured jar on the right of the picture below; however, I would like to find a way the create this liveliness in the wall without relying on the texture to do so.

 I have also been working more on my cup sets project. I have been making lots of smallish cups similar in style and pattern. I have been using porcelain, an iron rich stoneware, and a


 Here is a
 (wood soda side of double cat)


