Monday, December 21, 2009

Semi Productive Weekend

This new pitcher form is I think just about right. It was thrown in two sections inspired by a video I saw of Linda Sikora on the craft in America website. I feel that, as Linda talks about in the video, throwing in sections really ads a lot more potential for interesting forms. I like the clean break between the belly and the neck. I think this is pretty much my ideal pitcher form and I will definitely continue to work with this process.
These new mug forms are essentially the hand cup "yunomi" style cups that I showed in my last post, but with a handle. Although these cups are originally inspired by Tom Turners cups I feel like I am slowly moving away from his design. After visiting Tom it has been really hard for me to break away from his influence, probably because his pots are so good! My main influence for putting a handle on these cups was from Don Sprague. Don has started to work with making tumblers/yunomi/whatever out of the same form as his mugs. I think that this is a very cool freedom because it allows you to do what the pot calls for, rather than deciding right away whether it will have a handle or not.
I have been working towards throwing larger forms, this one is about 6.5 lbs and about 9x9 inches. I like the form a lot and will probably leave this with no surface decoration and save it for the wood kiln. I find that the wood kiln helps to emphasize a good form while the electric kiln can make them very static and boring.
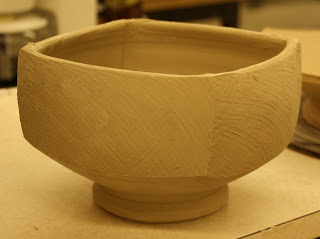
I have been making a lot of jars recently simply because that's what I feel like making. I tried out some new ideas on these two and I am reasonably happy with the results.
All in all I would say that I tried out some good ideas this weekend and have some good stuff to go off of. I am still working on getting up the second "journey of a cup" post which SHOULD be up in the next week or so.

Tuesday, December 15, 2009

The Journey of a Cup


First the cups are thrown on small square bats to a gauge. The bats allow me to leave them on bats but not take up alot of space. The gauge alows me to throw them all to pretty much the same size.

when the cups are soft leather hard (next day) they are paddled with a textured paddle to a pentagonal shape. They are then stamped with various small stamps on each face. Then they are turned over and allowed to dry to leather hard before trimming.

Not all of them make the cut!

Once leather hard they are trimmed and allowed to dry the rest of the way
Keep an eye out for the completion of these cups. I will post my glazing process and then a picture of the fineshed set!

Keeping On

I've been keeping on in the studio trying to make some pots for my portfolio. I'm also trying to make a lot of pots because I find that when I unload a kiln all my pots are traded away or sent off to shows. I don't care to much about using and living with my own pots, but I think that it is good feed back to be able to use your pots and see what works and what doesn't. Aside from these pots I've got a bisque to hopefully unload tomorrow which should eventually leave me with some of my pots to keep. Ive been working on testing some cone six glazes so that I can become less dependant on wood firing. The only reason being that I have somewhat limited access to wood firing and I want to be able to finish more work. Also I think it will be cool to be able to have more control over my glazes and more of an idea how they will turn out. I am currently working on a very runny transparent amber glaze and an off white satin mate to use together. I have also been working on a celedon but after many frustrating tests has been put on hold. I have recently been working on making "My pots" as opposed to copying others. This is one of the reason I tried out the over the top handle on one of the teapots. I like the idea but the form needs a little tweaking. I feel I have some good ideas for making this new handle work, which is good and I am excited to see how they work. which handle do you like better? I also just threw these two lidded jars which I think I am going to try some new types of fluting on. That's all for now but I've got a post coming of my process of making cups from start to finish.

Wednesday, December 9, 2009

Home Made/ Found Tools

Tools are a very important part of being successful at whatever it is you are trying to accomplish. When it comes to pots, lots of very good tools can be bought at pottery supplies stores (mud tools and van guilder) to name a few. Although lots of tools are readily available sometime found objects can be used and or altered into a tool. Pretty much anything metal found in a hardware store can be used in one way or another. Door knobs, hacksaw/jigsaw blades, and drill bits are some of my favorites. Also wooden dowels work really well to carve into a stamp. Making your own tools, in my opinion, is a very important step into finding your own voice or style through your pots. Pretty much anything can be used in some way to aid your making process and seeing something where others may not can lead to amazing pots!

DOGGY

Wednesday, December 2, 2009

NEW POTS!

I just got some fresh pots from the wood kiln. Thanks to Mark Terry I was able to get a few pots into a recent firing at his Noble Hill Anagama. Marks kiln is built on his parents Christmas tree farm near Verbort Oregon. This was my third time firing at Marks kiln and every time has been awesome. I got a few other pots out of the kiln that I will post some pictures of soon. These two pots are the two that I have selected to enter into George Fox Universities High school Art North West show. The deadline for submissions was today so I had to photograph the pots and burn the images to disc(well thank you Amy for doing that) and then drive the disc up to Newberg to GFU. I cant complain though it was definitely worth it to get these two into the show!


Tuesday, December 1, 2009

Don Sprague Workshop

A couple of weeks ago I attended a workshop by Don Sprague at Chemeketa community college. It was a two day workshop from about 9-4 on a Saturday and Sunday. Don demonstrated many of the forms he makes and gave a brief slide lecture. The workshop was awesome and I was very intrigued the whole time. Among other pots Don demonstrated


A very large platter (about 30 inches)


A square SureFormed bowl


A large Square salad bowl


A Large Pitcher


The workshop was great and I learned a lot from Don. Don is a great potter and I look forward to seeing more of his work in the future.


Monday, November 23, 2009

Mugs!

Top from left: Amy Burnham, Tom Turner, Ron Linn, Denis Miners
Bottom from left: Don Sprague, Don Sprague, Scott Mackey, Jeff Campana


Mugs are one of my favorite kinds of pots. Whether made by a mentor, teacher, friend, or just a potter that you admire, mugs are an intimate pot that communicate to the user. I believe that mugs communicate the makers personality and their personal style. While mugs seem to be a somewhat basic form, a lot of thought and planning goes into a well designed and made mug. The lip, handle size and shape, the shape of the mug, and the size of the mug are just a few of many considerations that I think of when making a mug. My point is that mugs are very commonly over looked as an economical or bread and butter pot. (they are made to sell). I believe that this is wrong. Mugs are usually one of the cheapest items a potter sells. With the recent desire for Japanese inspired pottery in the American society tea bowls and yunomi have become very popular forms. While I do appreciate the value of these pots I believe that they are a fad in America. I believe that a mug is the real "American tea bowl" even though American potters are selling tea bowls and yunomi for two and three times as much money as mugs. This is disturbing to me because the original beauty found in Japanese and Korean tea bowls was in the simplicity of them. The American society has turned this tea bowl form into the exact opposite. These are just my ideas, what do you think?

Friday, November 20, 2009

'wedgin' wire

On wednesday I made this wedging wire. I have been contemplating buying one from georgies, the local ceramic supply, but decided to try to make my own. I am very greatful that i did because the one at georgies was about 75$. I made mine in about 15 minutes for less than 20$. I found all the matterials i needed at my local home depot. The design is pretty straitforward, a wire at an angle ontop of a table. I used some twisty bolt things, scientific term, to tighten it and that was pretty much it.

Wednesday, November 11, 2009

Pots in Process


small covered jarslarge-ish pitcher
I worked a little in My studio on my Wednesday off from school. I finished up some pots made during this past weekend. I have been working on developing a good pitcher form and most have had this stamped and pushed out deco which i like. I think I like a split rim better than just the flat one. Also I think I need to leave a foot to trim. I like the extra stamping around the bigger stamps and I think I will continue to do this.
The covered jars were both made at the same time so they were sort of a little mini series. It is odd how when working in a series the pots change usually for the better. In my mini series the jar on the right was thrown first and the one on the left thrown second. Even from just making two the second jar was a little more bulbous and the shape a little better. Also the lid was a bit smaller which is what I wanted. The funny thing is that I decorated the one on the right second. This resulted in it having more decoration. I do like the simplicity on the left one though. All in all I think I learned a lot from these three pots and will continue to refine my ideas.


Tuesday, November 3, 2009

Redux Kiln on the way

I have recently taken on the project of building a small propane reduction kiln. The kiln has to be made on a cart to be transported from inside to outside due to school regulations. This posses several problems. First off the kiln must be a very stable and simple design to be able to be moved without dammage. The cart also introduces size limmitations.
I eventually came up with a plan for an about 7 cubic foot softbrick kiln(with the help of many people). The kiln has one 100,000 btu burner.
I am waiting for the shelves to arrive before i can fire it. The first couple of firings will be of all refiring woodfired pots. This is because i have a general idea of what these glazes should look like at the right temp. and right amout of reduction. I also have lots of pots that need to be refired from previous expiriments.
I hope to be able to fire soon(I will as soon as I get the shelves) and will post more about the kiln when I do fire it.

Bison tools


I recently purchased my first ever bison trimming tool. Phil puburka is making the tools out of his studio in las vegas. I have heard of bison tools by recomendation of countless potters. I have wanted to purchase my own for a long time and finally decided to. The reason that this is a big decision is because the tools are over $50. This sounds like alot of money for one single tool but it is well worth it.


First off the tool itself is a work of art. Great craftmanship is shown from the blade and throught the handle. Also the tool performs supirior to any tool i have ever used before. The blade will stay sharp for years. This tool will outlast any other trimming tool by at least five times the amount of use. And at ten dollars per regular trimming tool this justifies the cost.


I am very satisfied with my tool and would recomend it to anyone in search of never buying another trimming tool again!

Thursday, October 15, 2009

Photography Feildtrip


quantity

youthfull


Bro


Architecture


Majestic


Wednesday, September 23, 2009

AP 3D

wood fired teapot (noble hill anagama) woodfired mug (noble hill anagama)
Woodfired garden lantern (east creak anagam)

I thought that for my first blog post it would be a good idea to post a few pictures of recent work and discus the purpose of this blog. I started making pots at the begining of last school year, so i have been making pots for a little over a year. I am now, in my junior year of high school, participating in an AP 3-Dementional design class and am required to create a blog for that class.
I have wanted to create a blog for a couple of months now after reading brandon phillips, kyle carpenters, and mickeal klines blogs to name a few. I have not been motivated enough to do so until now. This blog will consist of events occuring in my AP 3D class as well as the pots I make this year.
In the Ap 3D class our goal is to create a portfolio of 20 works of art created within the last year to be submitted for review to the colledge board. http://apcentral.collegeboard.com/apc/members/exam/exam_questions/2135.html?affiliateId=APSamp&bannerId=st3d the portfolio is split into three sections consentration, breath, and quality. consentration consisting of 11 works, breath 9, and the quality section is detail images of your best works within the portfolio.
Thats all I have for now but I have started working on a small downdraft propane reduction kiln at school so i will eventually have some info on that up.


Tuesday, September 22, 2009

new blog

this is my new blog for Ap 3-d design class.